Deployable LOGITacker (AP Mode)

The stuff I’ve seen around the LOGITacker has had the unit attached to either a computer or mobile device. I wanted to see if I could find a “low cost” setup that could be left behind at an engagement or hidden and accessed remotely. Something that wouldn’t break the bank if it was lost or destroyed.

LOGI.jpg

Equipment

Total Cost: $65.66

Setup

I’m using the standard Raspbian install for the Pi Zero W (https://www.raspberrypi.org/downloads/raspbian/).

I went with “Raspbian Buster with Desktop”. For this setup I put the Pi in AP mode so I’m able to interact with it via it’s WIFI AP. I followed this documentation (https://www.raspberrypi.org/documentation/configuration/wireless/access-point.md) . One item to note, hostapd refused to start for me. Upon reading the logs, I found that it was getting hung up on the line “ignore_broadcast_ssid=0” in the hostapd.conf file. After removing that line and saving, I was able to get the Pi running properly.

If setup following the guide, you should be able to connect to the AP with the SSID/Key that you set. Then start up your SSH client of your choice and SSH to 192.168.4.1. Once connected, you need to install screen (sudo apt-get update) & (sudo apt-get install screen).

I setup my nRF52840 according to the guide I have here (https://www.jameshickok.com/blog/logitacker-e79n7)

Once everything is up and running, SSH into your Pi and type: screen /dev/ttyACM0

The fun begins!

You should now have remote access to your LOGITacker!

Raspberry Pi Zero W Access Point (AP)

Raspberry Pi Zero W Access Point (AP)

Sniffing decrypted keystrokes from Logitech K400r

Sniffing decrypted keystrokes from Logitech K400r

Showing currently loaded script

Showing currently loaded script

Script ready to execute on Surface Go using Logitech K400r

Script ready to execute on Surface Go using Logitech K400r

UPDATED: Meterpreter shell for LOGITacker

*Update at bottom*

I wanted to see if I could use the LOGITacker to compromise a machine remotely.  This is just a quick and dirty attempt.  I'm using a Logitech MX Master and nano receiver as the device being attacked on the victim machine.  Even though the only device attached is a mouse, we are still able to inject keystrokes.


Rundown of what is happening:

  1. Launch Virus & Threat Protection

  2. Disable Real-Time Protection

  3. Open Command Prompt

  4. Use certutil.exe to download malicious payload and execute


I'm sure there are better ways to accomplish the same end goal but this was my quick attempt at "hey, can this work?"


The script the LOGITacker is executing is as follows:

logi6.png

Once we run the script, we have a shell from our attacker machine! Here is a video of it in action:

UPDATE:

There was some question about further detail in working with LOGITacker. Here is more information:

Once a target is detected, you can enter inject mode. Type “inject target <MAC>” and press return.

LOGI3.JPG

From there, you should be able to start writing your scripts!

Here is a quick rundown of the main commands:

script press <key> - press the corresponding <key>: GUI, ALT, LEFT, UP

script delay 500 - wait 500ms before next command

script string “cmd.exe” - type cmd.exe

script show - show the current commands

script undo - undo the last command

script store “scriptName” - save script to device as “scriptName”

script load “scriptName” - load script

inject execute - run current script

press, delay, string and show commands

press, delay, string and show commands

LOGITacker setup for nRF52840 MDK USB Dongle

All credit goes to mame82 (https://twitter.com/mame82)

Once downloaded and installed, install the "Programmer" under Add/remove apps.

logi1.png

After the Programmer is installed, hold down the button on the dongle and insert into the USB port.  The dongle should enter flashing mode with a solid green and slowly flashing red light. If the device doesn't appear in the drop down, close and restart the Programmer app.

logi2.png

Once selected, add the logitacker_mdk_dongle.hex and select Write.

logi3.png

The device will not show up properly in the programmer after it is flashed but you should see the new firmware version in the selection pane.

logi4.png

Use the following settings for putty:

https://infocenter.nordicsemi.com/topic/com.nordic.infocenter.sdk5.v15.0.0/lib_cli.html#lib_cli_terminal_settings


Once connected, you should be able to connect and see your device.

logi5.png

So there you have it! You are now on your way to see what your Logitech devices are doing. Remember to be responsible and don’t do anything illegal.

LazySysAdmin

Introduction

Today I tried LazySysAdmin from VulnHub. (https://www.vulnhub.com/entry/lazysysadmin-1,205/)

Steps

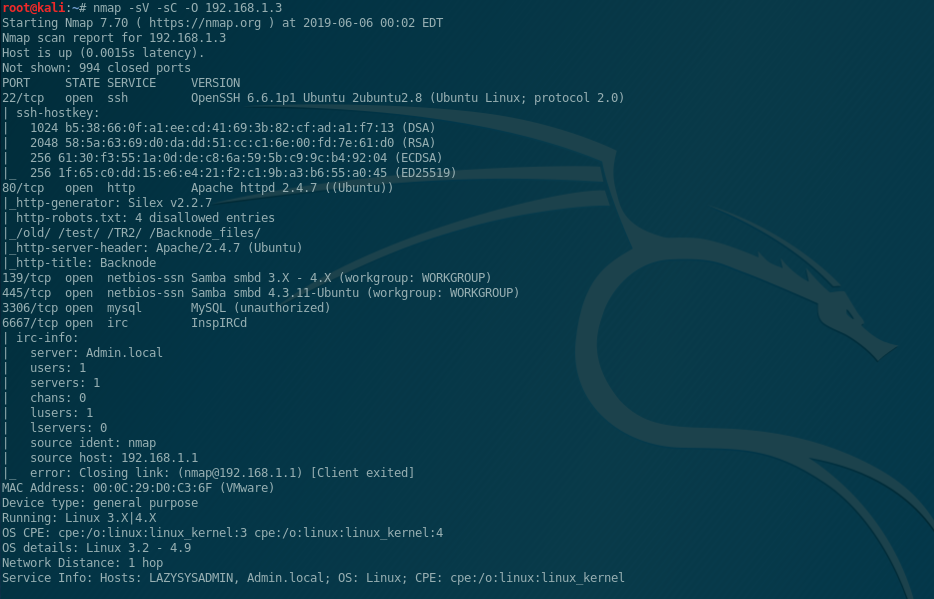
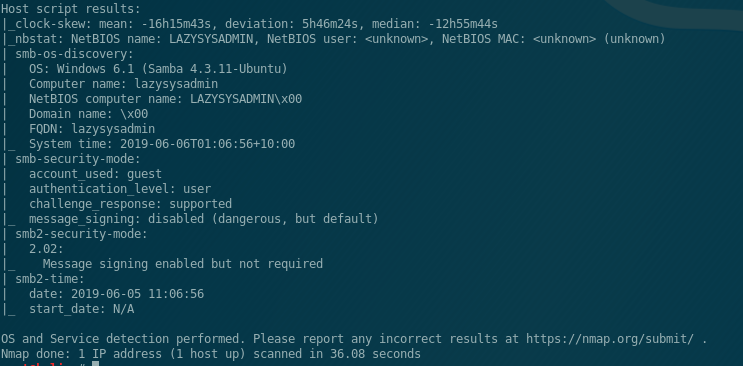
Started with the good ole nmap. This time I use the flag -sC which uses the default scripts. I also used the normal flags that I usually go with -sV (Version Detection) and -O (OS Detection)

We see:

  • SSH

  • HTTP

  • SMB

  • MYSQL

  • IRC

lazysys1.PNG
lazysys2.PNG

We see that it has Samba running and give that a quick check. It turns out that it has Anonymous read access enabled!

lazysys3.PNG

We see what looks like a website root directory. Poking at the files, we see one that looks like it contains some kind of password.

We take a look at what website that it is running. None of the links seem to work or provide any additional information. Perhaps it’s a dead website.

lazysys7.PNG

We remember the /wordpress/ directory from the SMB enumeration and take a look at that. We see a user ‘togie’ who is clearly not happy with setting up wordpress. We now have a name of a user setting up websites and a password for someone who doesn’t care anymore.

We take the username and password over to the open SSH port and give it a go. Success!!

We see that the user togie was truly lazy and saved his password where he could easily see and remember it. Unfortunately, so could anyone else that tried some basic enumeration.

lazysys9.PNG

Once we are connected to SSH, we try the easiest way to get root ‘sudo su’. Turns out this user has sudo privileges! we are root!!

Conclusion

This VulnHub machine was pretty fun! One neat thing I did learn while poking around was a new way to escape a privileged shell. Between SSH as togie and the ‘sudo su’ command we were locked in a restricted shell. Jumping right to root got us out of the restricted shell. While playing around with the restricted shell, I found the an escape path on this page (http://www.cyberry.co.uk/resources/breaking-out-of-jail-shell/) that used man pages. Open a man page and then type ‘!bash’. I’m not sure how often that escape works, but it happened to work here!

lazysys11.PNG

Kioptrix Level 1 - My first writeup!

Introduction

So this is my first ever VulnHub write-up! It’s probably not the best or most clearly written but we all gotta start somewhere, right??

For my first write-up I’ve chosen Kioptrix Level 1 to keep things simple. (https://www.vulnhub.com/entry/kioptrix-level-1-1,22/)

Start

We first go with nmap to see what we have to work with.

Kioptrix1.png

We see that Samba is running on port 139 and we want to dig in a little more. Unfortunately it looks like the version of smbclient that enum4linux uses no longer reports samba version. I’m not sure why it works this way, I haven’t dug into it much yet.

Kioptrix2.png

To enumerate the Samba version, we start up Metasploits smb_version scanner.

Kioptrix3.png

We see that the machine is running Samba 2.2.1a. A searchspoit search shows nothing for the exact version. Altering the search shows some more options. There are a bunch of Samba 2.2.x exploits we can look at.

Kioptrix4.png

Taking a peek at the first 2.2.x exploit shows that it is for a BSD machine. The nmap scan doesn’t seem to indicate BSD so we can skip this one.

Kioptrix5.png

Checking the second 2.2.x exploit, we see that it is a generic linux Samba exploit so we decide to try that one.

Kioptrix6.png

After doing a quick check of the exploit for any special compiling options or changes we need to make, we see it’s ready to go as is and compile it. Once complied we run it to see the arguments we need to provide. Once we see we just need to provide an IP, we run the exploit.

Kioptrix7.png

And we have root! :)

Conclusion

Well, If you’ve made it this far, thank you! Hopefully this wasn’t too painful to read and maybe even somewhat informative! I hope to do more in the future while honing in my documentation and blogging skills.